As a plastic parts manufacturer, we all know cycle time is the most common efficiency measure in most plants. But, a press can meet cycle time and still waste hours due to purge time, mold changes or short-shot defects. True injection molding efficiency means you need to monitor OEE (Overall Equip-ment Effectiveness). This includes reducing scrap, improving maintenance practices, automating pro-duction shifts and optimizing resource utilization.
1. Track OEE, not just cycle time, to find hidden losses in the molding cell
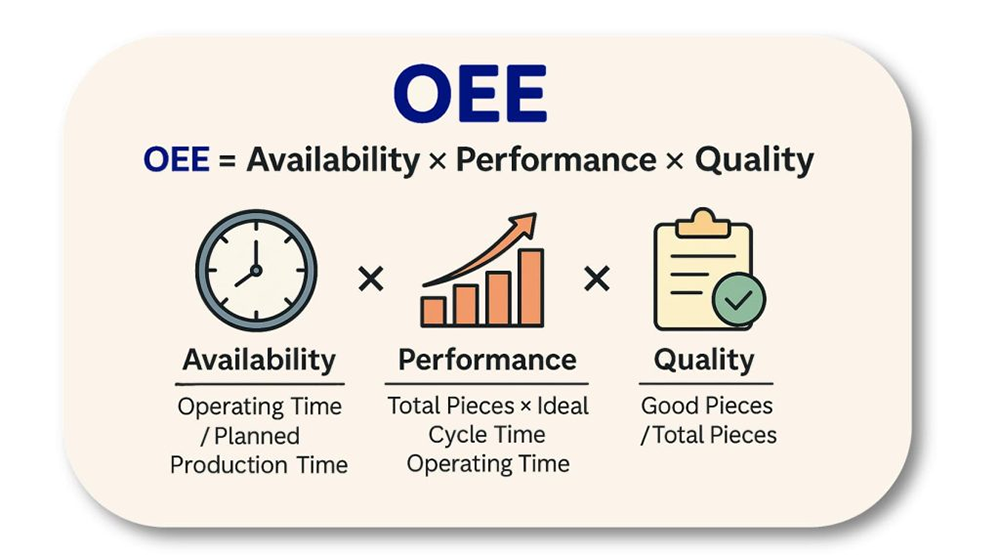 Monitoring OEE at cavity level gives insights into losses that cycle time metrics do not.
Where OEE losses hide in the cell
The cycle time target can mask losses within the molding cell. A press could meet cycle time and yet have poor efficiency. OEE comes in here. It categorizes losses into three groups:
- Availability losses occur during purging, mold changeovers, and hot-runner warm-up periods.
- Performance decreases when the cooling is done conservatively for a marginal cavity.
- Quality losses include short shots, flash defects, and rejected parts caused by pack pressure drift.
If a multi-cavity mold is operating at 60% to 70% OEE, this is a good indicator of imbalance among cavi-ties in a family mold.
How to fix losses using the OEE breakdown
Based on OEE breakdown, determine what fix you should make first. Do not depend on plant average values.
- When the scrap collects in a cavity, consider changing either the mold or the process.
- Standardize warm-up procedures to reduce time lost during hot-runner startup.
- Run quick purge sequences to minimize downtime due to frequent color changes.
Use the JIPM (Japan Institute of Plant Maintenance) 85% benchmark to compare every loss cat-egory to set realistic goals. One press with a bad cavity will require a separate fix from one press wast-ing hours due to mold changeovers. Once you identify the loss category, you can target your mainte-nance budget to real problems.
2. Cut scrap by tracking cavity pressure and first pass yield
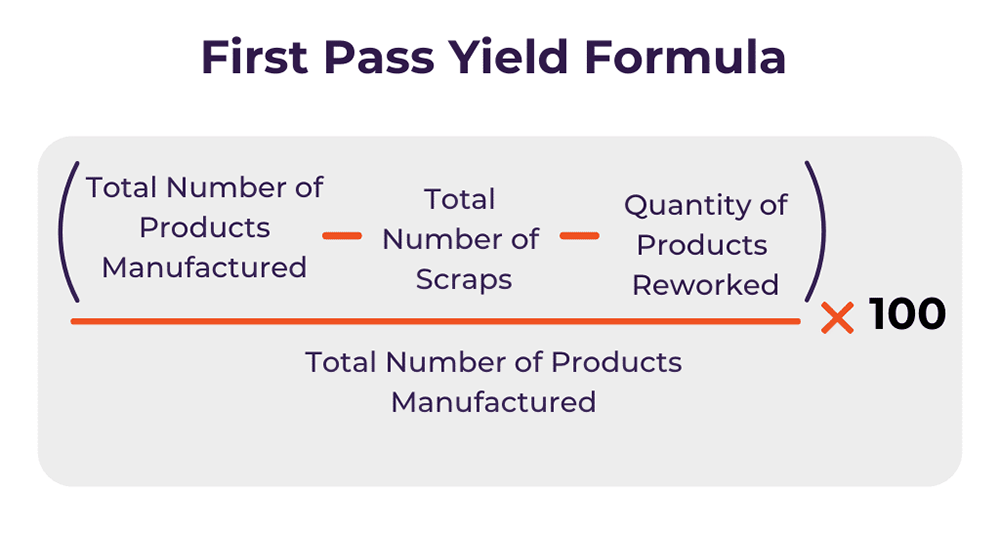 If the percentage of scrap is high, a fast cycle is of no value.
Detect the defects that lower first pass yield
There are six common defect types and each defect is an indicator of some process error. These are flash, short shots, warpage, weld lines, sink marks and burn marks.
- Common causes of flash include insufficient clamp force, excessive injection pressure, or worn parting lines.
- Sink marks are caused by insufficient pack pressure or brief hold time.
- If a cavity short-shots repeatedly, it could be that it has runner drool or a vent blockage.
Once you have identified the defect with its cause, the scrap reduction becomes a definable task. Compare the 1st pass yield to spot this trend.
How to fix scrap with cavity pressure and melt cushion data
Check the pressure curve within each cavity for every shot, even the filling curve. Loss of pressure is an indicator of potential underfill. Pressure spikes point to overpack or potential flash. Make adjustments to the hold time or pack pressure as soon as the curve changes before waste builds up.
Monitor consistency of the melt cushion from shot to shot. Think of melt cushion monitoring as injec-tion molding's SPC equivalent. Scientific process parameters provide an operator with a clear indication before any defects arrive at shipping. With pressure sensors or vision inspection, plants can get 10-20% reduction in the amount of scrap. With this approach, 1st pass yield becomes a controllable metric.
3. Reduce downtime and changeover time with predictive maintenance and SMED
 Downtime and changeover take hours, but are not reflected in cycle time measurements. Heater bands on hot runners and check rings are the most common failure points. Both SMED (Single-Minute Exchange of Die) and predictive maintenance reduce these losses.
Components That Trigger Maintenance Alerts Most maintenance alerts come from heater bands and check rings on hot runners. Check ring wear produces an irregular melt cushion and short shots. Failed heater bands can lead to drooling or frozen gates. The abrasive resin grinds screw and barrel surfaces, resulting in irregular shot weight.
Scaling in mold cooling lines increases cycle cooling duration, but does not alter setpoint. It occurs without warning. By watching for these symptoms you'll prevent production shutdowns. These fail-ures result in unplanned stops and loss of 5 to 20% of overall capacity.
How to cut downtime with SMED and predictive maintenance
Use SMED for mold changeovers. Utilize quick-change systems, standard disconnects, pre-staged robot tooling and preheated molds. Use operational data to schedule maintenance instead of relying solely on fixed maintenance intervals. Programs using predictive maintenance experience 30 to 50% fewer unplanned stops. Pre-staging tooling and equipment reduces changeover duration. This typically represents the biggest cu-mulative loss of production capacity in plants making multiple products. These practices turn reactive repairs into scheduled maintenance windows. Plus, standard connections lower the possibilities of an incompatible setup that may result in delayed restarts.
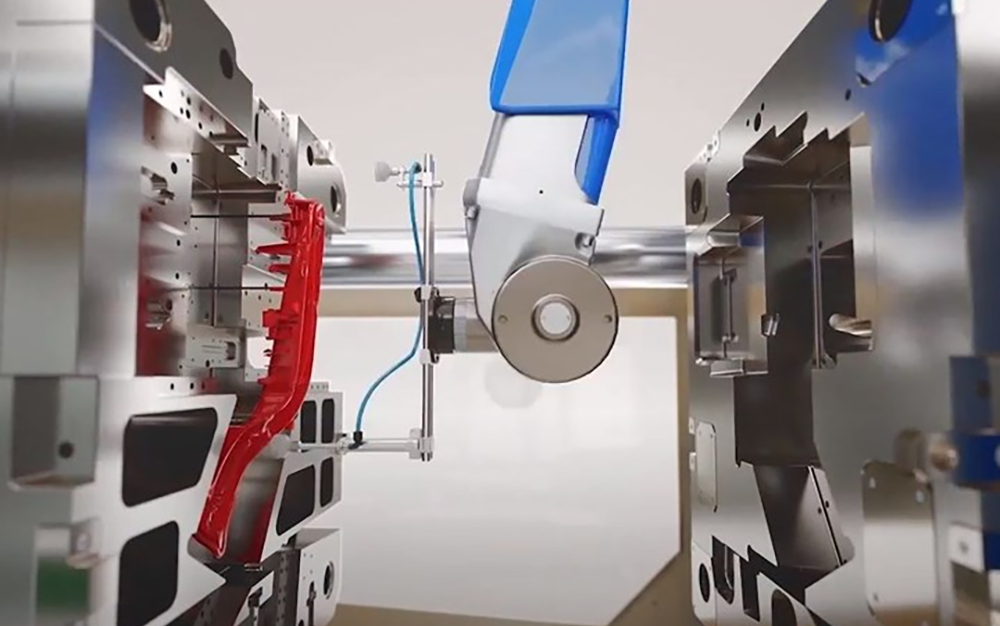
4. Automate part removal and shift coverage to run lights-out injection molding
Unattended operation calls for more than just consistent cycle time.
Prerequisites for unattended operation
Before adding automation, shot weight needs to be the same throughout a complete shift. Unbal-anced shot weight will only get worse when left unmonitored. Check that inline degating is functioning on all cycles, not simply the majority. Make sure the mold protection works right. Clamp tonnage mon-itoring has to halt the press before any crash when needed.
Without verifying, you risk unattended mold crashes and scrap production. If any of these tests fail under supervision, the press isn't ready to run unattended.
Robotic takeout and monitoring systems
Implement robotic takeout after these three checks pass routinely. Combine the robot with shot weighing to halt the cell automatically if drift occurs. This blend covers unworked hours, sometimes allowing an actual third shift. Parts get tallied, sorted and boxed without an operator there.
Lights-out injection molding demands verified process stability, not merely robotic takeout.
5. Cut material and energy waste through resin, runner and machine choices
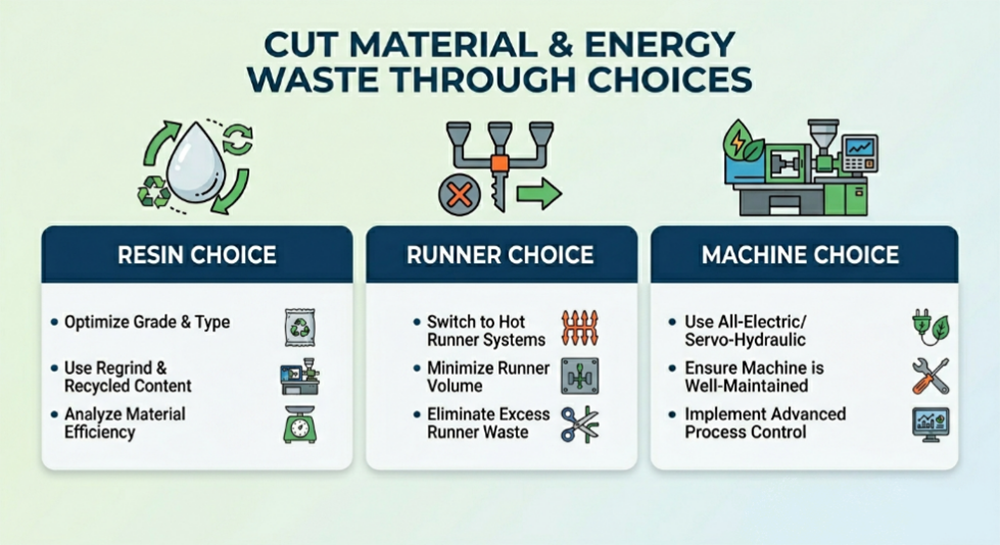 The expenses for resin and energy continue well beyond when the press stops. Here's where waste occurs and which options reduce it.
Where resin and energy get wasted
If appropriate drying is not done, hygroscopic resins result in splay and weak parts. With family molds containing unbalanced runners, cavities filling too early result in resin waste. Between cycles, heater bands running at full output waste energy. When hydraulic presses idle during pauses, they use power even if they are not producing parts. If regrind is added over the supplier's specified limit, it reduces part strength. All of these losses increase cost per part but do not affect cycle time.
How to fix waste through resin, runner and machine choices
Set up resin drying according to supplier's spec prior to material entering the barrel. Keep regrind ratio at supplier's limit to ensure part strength. Replace the runners in family molds or use hot runner sys-tems to reduce resin waste. If you are comparing all-electric versus hydraulic machines, don't consider just the purchase price, consider per-shot energy as well. These decisions reduce the part cost with no cycle time reduction.
To sum up
Manufacturers that leverage these five levers experience fewer unplanned stops, smaller scrap rates and lower cost per part. All those improvements call for precision tooling and reliable process control.
Related questions
What is a good OEE benchmark for an injection molding cell?
The OEE of most molding cells is 65-80%. The JIPM benchmark for world-class perfor-mance is 85%. The gap to that standard will identify where your efforts for improvement should be concentrated.
What are the most common injection molding components that cause a predictive maintenance alert?
Most alerts are triggered by check rings, hot runner heater elements as well as screw and barrel com-ponents. Each of these manifests as follows: Wear on the check ring shows up as an inconsistent cush-ion. Failure of the heater bands results in a drool or freeze-off. The abrasive resin grinds down screw and barrel surfaces causing shot weight inconsistencies.
How does SMED cut mold changeover duration on the production floor?
SMED standardizes the sequence for changeover. Fast-connect fittings for water and hot-runner lines eliminate guesswork. Pre-staged robot tooling along with mold preheating further reduce setup time. All these steps eliminate the biggest ongoing availability loss across multi-product plants.